
Jamf Pro API - Mass Unmanage
As many of you in the Jamf and Mac Admin community know, Jamf has been making to the Jamf management account. This has had the unexpected side effect of changing how admins can perform management tasks via mass actions in Jamf. In particular, you cannot perform a mass action to set computers to be unmanaged. This function was removed in Jamf Pro 10.49. Rich Trouton has a nice write-up about it: https://derflounder.wordpress.com/2023/08/15/updating-management-status-in-jamf-pro-computer-inventory-records-on-jamf-pro-10-49-0-and-later/. If you feel inclined, vote up JN-I-27551 to get this functionality added back to Jamf.
At my work, we rely on performing mass “unmanages” of Macs that have stopped talking to Jamf in over a year or more. Primarily, we do this to reduce the number of Macs we need to put on the rolls when we do Jamf Pro renewals. But now that we can’t do this via the Jamf GUI anymore, a new method needed to be developed.
This seemed like an excellent opportunity to investigate using the Jamf Pro API to do the unmanage. It would be even better if I could schedule and orchestrate it using GitHub Actions, like I have AutoPkg + Jamf Upload setup. I’ve done my share of spelunking in the Jamf API (both classic and Pro) and troubleshooting the vague weirdness that is the Jamf Pro Power BI connector and Power BI. Since Jamf has also been moving away from Basic Authentication, I also wanted to utilize the new API Roles and Clients functionality. Since I wasn’t a genius Jamf API and Python wizard, I really wanted to dive into some API wrapper tools like Jamf Pro SDK for Python or the JPS API Wrapper so I wouldn’t need to learn all the ins and outs of the Jamf API. I learned about these 2 projects at JNUC or other MacAdmins resources.
I have a GitHub repository setup that includes all my API examples and GitHub Action workflows if you want to test it in your environments: https://github.com/technotica/Jamf-API
The systems engineering brain took over; here’s the requirements:
Python
GitHub Actions
Utilize secrets to store credential information
Have it run on a schedule
Jamf Pro API
Jamf API Roles and Clients
Jamf API wrapper
Background
I wanted to start small and not just jump into setting a bunch of Macs to unmanaged on the first go. Another side project I had in the works was we needed a method to record a computer’s Jamf site in an Extension Attribute. Why do you need to record a Jamf site in an Extension Attribute in the first place? I mean, it does show up in the Jamf inventory when you look at a Mac, right? It sure does, but Jamf does not make a search criteria available, so we cannot make smart groups or searches based on Jamf site membership. In environments like mine, where we have 50+ Jamf sites, it is important for us to provide reports based on sites.
At the time, we were collecting the Jamf Site via an Extension Attribute by running it as a script that did an API call to our Jamf Pro server when the device performed inventory. We had to give it API credentials in some way, which wasn’t totally obfuscated and met best security practices. Plus, it was definitely going to break once Jamf takes away Basic Authentication. This method wasn’t exactly 100% reliable either, and Macs often wouldn’t have correct Jamf site information, or it would be blank :(
Testing with Setting an Extension Attribute
So, with that as a jumping off point, I started playing around with both the Jamf Pro SDK for Python and the JPS API Wrapper in some Python scripts I started standing up and testing against our Dev Jamf Pro Server. My basic steps for setting the Jamf Site Extension Attribute. First, create a test Extension Attribute in Jamf, TESTING - Jamf Site, using the Jamf Pro GUI.
In Python, via one of the API wrapper tools:
Get Token
Get All Computers and each computer’s Jamf ID
For each computer, get its Jamf Site
Get Computers Extension Attribute, TESTING - Jamf Site
If TESTING - Jamf Site does not match the computer’s Site Name, then
Perform a PUT to TESTING - Jamf Site with the Jamf site from each computer
Read out the result of each computer and extension attribute for TESTING - Jamf Site (to validate it was set)
Honestly, I kept running into problems, particularly with the custom domain we have set up with Jamf Cloud and that we still use port 8443 instead of the standard 443. I also hit some bugs with duplicate computer and MAC records and HTTP errors to debug. Many of these issues seem to be related to the Jamf Classic API. I also gave myself a crash course in JSON formatting and extracting JSON data using Python.
Here are few I ran into:
Conflict 409 Error: Duplicate alternate MAC address for Jamf API call
Jamf Feature JN-I-16465: Allow API update of records with duplicate Serial, MAC etc
Jamf Feature JN-I-18092: Make the API PUT look at unique IDs instead of names to catch conflicts
Jamf PI PI113594 (Fixed in Jamf Pro 11.3)
Performing multiple, overlapping inventory updates or API calls against the same computer record may result in the loss of extension attribute information on that inventory record. For example, a policy that includes an inventory update executed upon startup could conflict with a regularly occuring inventory update triggered by computer check-in.
The lack of verbose output (errors) I saw from the Jamf Pro SDK made it very difficult to troubleshoot. I suspect most of the issues I saw were due to me "holding it wrong" and using port 8443, which I couldn't control or overwrite easily. So, I moved to trying the JPS API Wrapper. With some luck and getting more comfortable with the API and Python, I got some more verbose output from the JPS API Wrapper that helped me figure out what was going on. I don’t doubt that I could move the processes I’m using to use the Jamf Pro SDK for Python.
Jamf Classic vs Jamf Pro API
Another quirk I found in testing between the Classic and Pro API is that when you use the Classic API to update a computer record in Jamf, it will also update the Last Inventory Date to when the API call was made. I don’t particularly like that functionality from using the Classic API. Our admins are accustomed to seeing the Last Inventory Date in Jamf as when the Mac last performed an inventory to Jamf. It is also a metric we use to determine if a Mac should be unmanaged; that is, if it hasn't been inventoried in > 1 year, we should unmanage it. So this is very unwelcome.
I discovered this problem on MacAdmins Slack and the Jamf Feature Request JN-I-22670 Rest API to not cause full inventory update. This feature request has been open since 2015.
The good news is that the Last Inventory Date is not changed if you use the Jamf Pro API. SMy plans for creating an extension attribute for the Jamf Site would be ok. The bad news is that I could not find a method to issue an unmanage command to a computer using the Jamf Pro API. To which my initial thought was….

Setup Instructions
The point of this blog post is to actually document that I was able to get this all to work. While the MacAdmin community has a ton of resources and super helpful people, I'm someone who needs to dig into a situation to understand it truly I actually have 3 Jamf API GitHub Action workflows currently running in our production environment. https://github.com/technotica/Jamf-API contains all the scripts and workflows you need to set this up in your environment. Cloning this repo into your environment is step 1 if you want to follow along.
Set Computer Extension Attribute Jamf Site
Set Mobile Device Extension Attribute Jamf Site
Unmanage a static group of Computers
Let’s dig into how to use my workflows to unmanage a static group of computers. Note that you don't have to run this workflow in GitHub Actions. You could edit the Python script to hardcode or prompt for the API Client and credentials if desired.
Create or Update a Computer Static Group
In our workflow, we create a static group in Jamf for Macs we want to be unmanaged. Since we’re such a distributed group in my work environment, our site admins expect a very ‘static’ group of Macs we will unmanage at particular time intervals in the year. We perform mass unmanages twice yearly, every May and December. If a Mac hasn’t inventoried or checked in with Jamf in more than a year, that Mac is up for an unmanage. When we announce a group of Macs are scheduled to be unmanaged, we don’t add anything more to to the list. We do review the group before the unmanage, to see if any stragglers started talking to Jamf again. If that happens, we remove them from the unmanage group.
For example, if a Mac hadn’t checked in since March 2022, it would be up for an unmanage in May 2023. We refer to these internally as “Tony Snaps” because…. Marvel nerds.
We use a tool called MUT to update a static group of Macs that are up for unmanage. In your environment, a smart group may be more appropriate.
Setup the API Roles and Clients
From Jamf’s documentation https://learn.jamf.com/bundle/jamf-pro-documentation-current/page/API_Roles_and_Clients.html:
The new API roles and clients functionality in Jamf Pro provides a dedicated interface for controlling access to the Jamf Pro API and the Classic API. Previously, performing API operations with Jamf Pro typically required creating user accounts specifically for that purpose. Now you can create custom privilege sets as API roles and then assign them as needed, ensuring API clients have only the necessary capabilities for their tasks. Roles can also be shared between clients or assigned in combination to one client, allowing you to manage and reuse privilege sets for various purposes in a convenient and granular way.
Follow the steps from Jamf’s documentation to create an API Role. The API Role will need the following permissions:
Read Computers
Update Computers
Read Computer Extension Attributes
Read Static Computer Groups
Update User
Create an API Client by following Jamf’s documentation and have it use the API role you just made. Copy the client ID and client credentials for use later.
Create Computer Extension Attributes
Since there is no method to update the management of a Mac using the Jamf Pro API, we are forced to use the Classic API and deal with the consequences of it also updating the Last Inventory Date. The solution I came up with was when a computer is unmanaged by the API command; it updates 2 extension attributes with some additional information. That way if we want to review a specific computer and why it was unmanaged, we’ll have additional information about what happened.
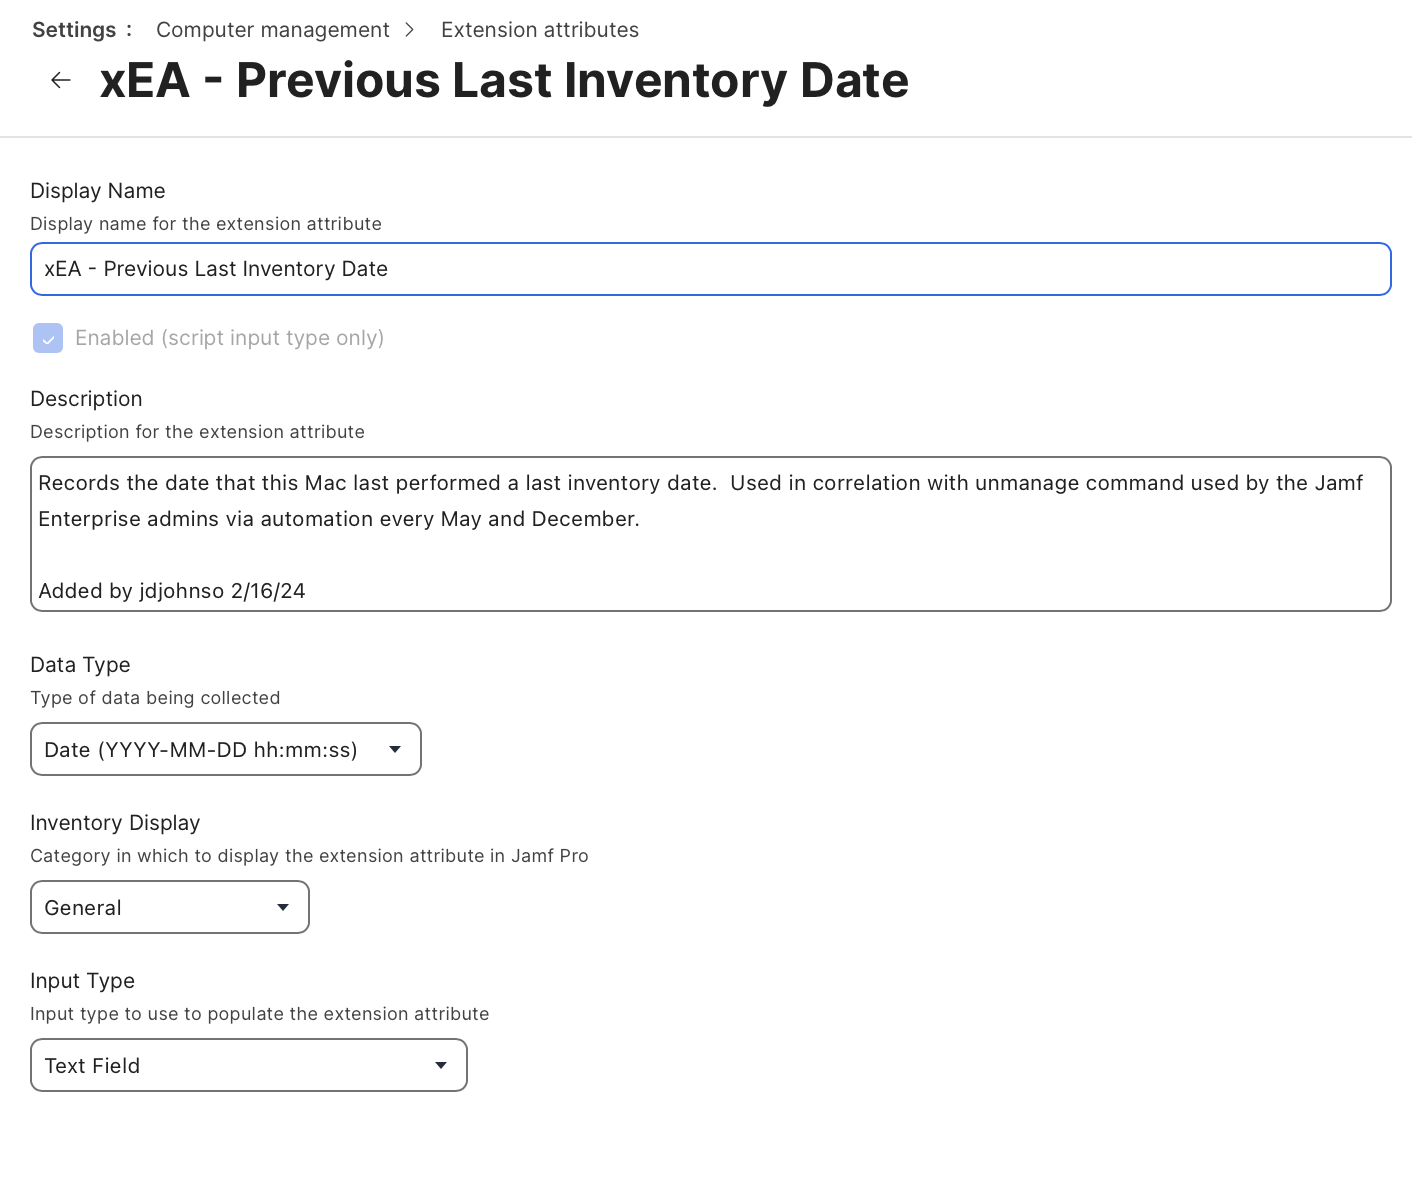
Create 2 Extension Attributes in the Jamf GUI using Jamf’s documentation: https://learn.jamf.com/en-US/bundle/jamf-pro-documentation-current/page/Computer_Extension_Attributes.html
xEA - Previous Last Inventory Date
The date the device actually last inventoried with Jamf
xEA - Unmanaged Date
The date the API issued the unmanage command
Create them as Text fields, set Data Type to Date (YYYY-MM-DD hh:mm:ss), and Inventory Display to General. See below for an example.
Create GitHub Repository Secrets
If desired, you can clone my repo to get started. I choose to put production workflows in GitHub Actions, so I don’t have to store any client credentials or run any workflows on my local Mac. Plus, my colleagues can run these workflows or review them anytime. We can also tie this to our change management systems.
Use the steps defined in https://docs.github.com/en/actions/security-guides/using-secrets-in-github-actions to add secrets to your repository.
JAMF_URL
Your Jamf Pro URL, e.g. https://jamfserver.jamfcloud.com
JAMF_CLIENT_ID
The Jamf API Client ID
JAMF_CLIENT_SECRET
The Jamf API Client Secret
Update GitHub Action Workflow
Under .github/workflows/Computers-Unmanage.yml, you must update lines 41 - 46 for your environment. In particular, ensure the IDs match your static group and the 2 extension attributes you made.
- name: Run API Python Script
  run: |
    python3 Action-Jamf_Pro_API-UnmanageComputers.py
  env:
    JSS_URL: ${{ secrets.JAMF_URL }}
    JSS_CLIENT_ID: ${{ secrets.JAMF_CLIENT_ID }}
    JSS_CLIENT_SECRET: ${{ secrets.JAMF_CLIENT_SECRET }}
    JSS_xEA_NAME_1: "xEA - Unmanaged Date"
    JSS_xEA_ID_1: "101"
    JSS_xEA_NAME_2: "xEA - Previous Last Inventory Date"
    JSS_xEA_ID_2: "102"
    JSS_STATIC_GROUP_NAME: "[Static] Macs to be Unmanaged"
    JSS_STATIC_GROUP_ID: "100"
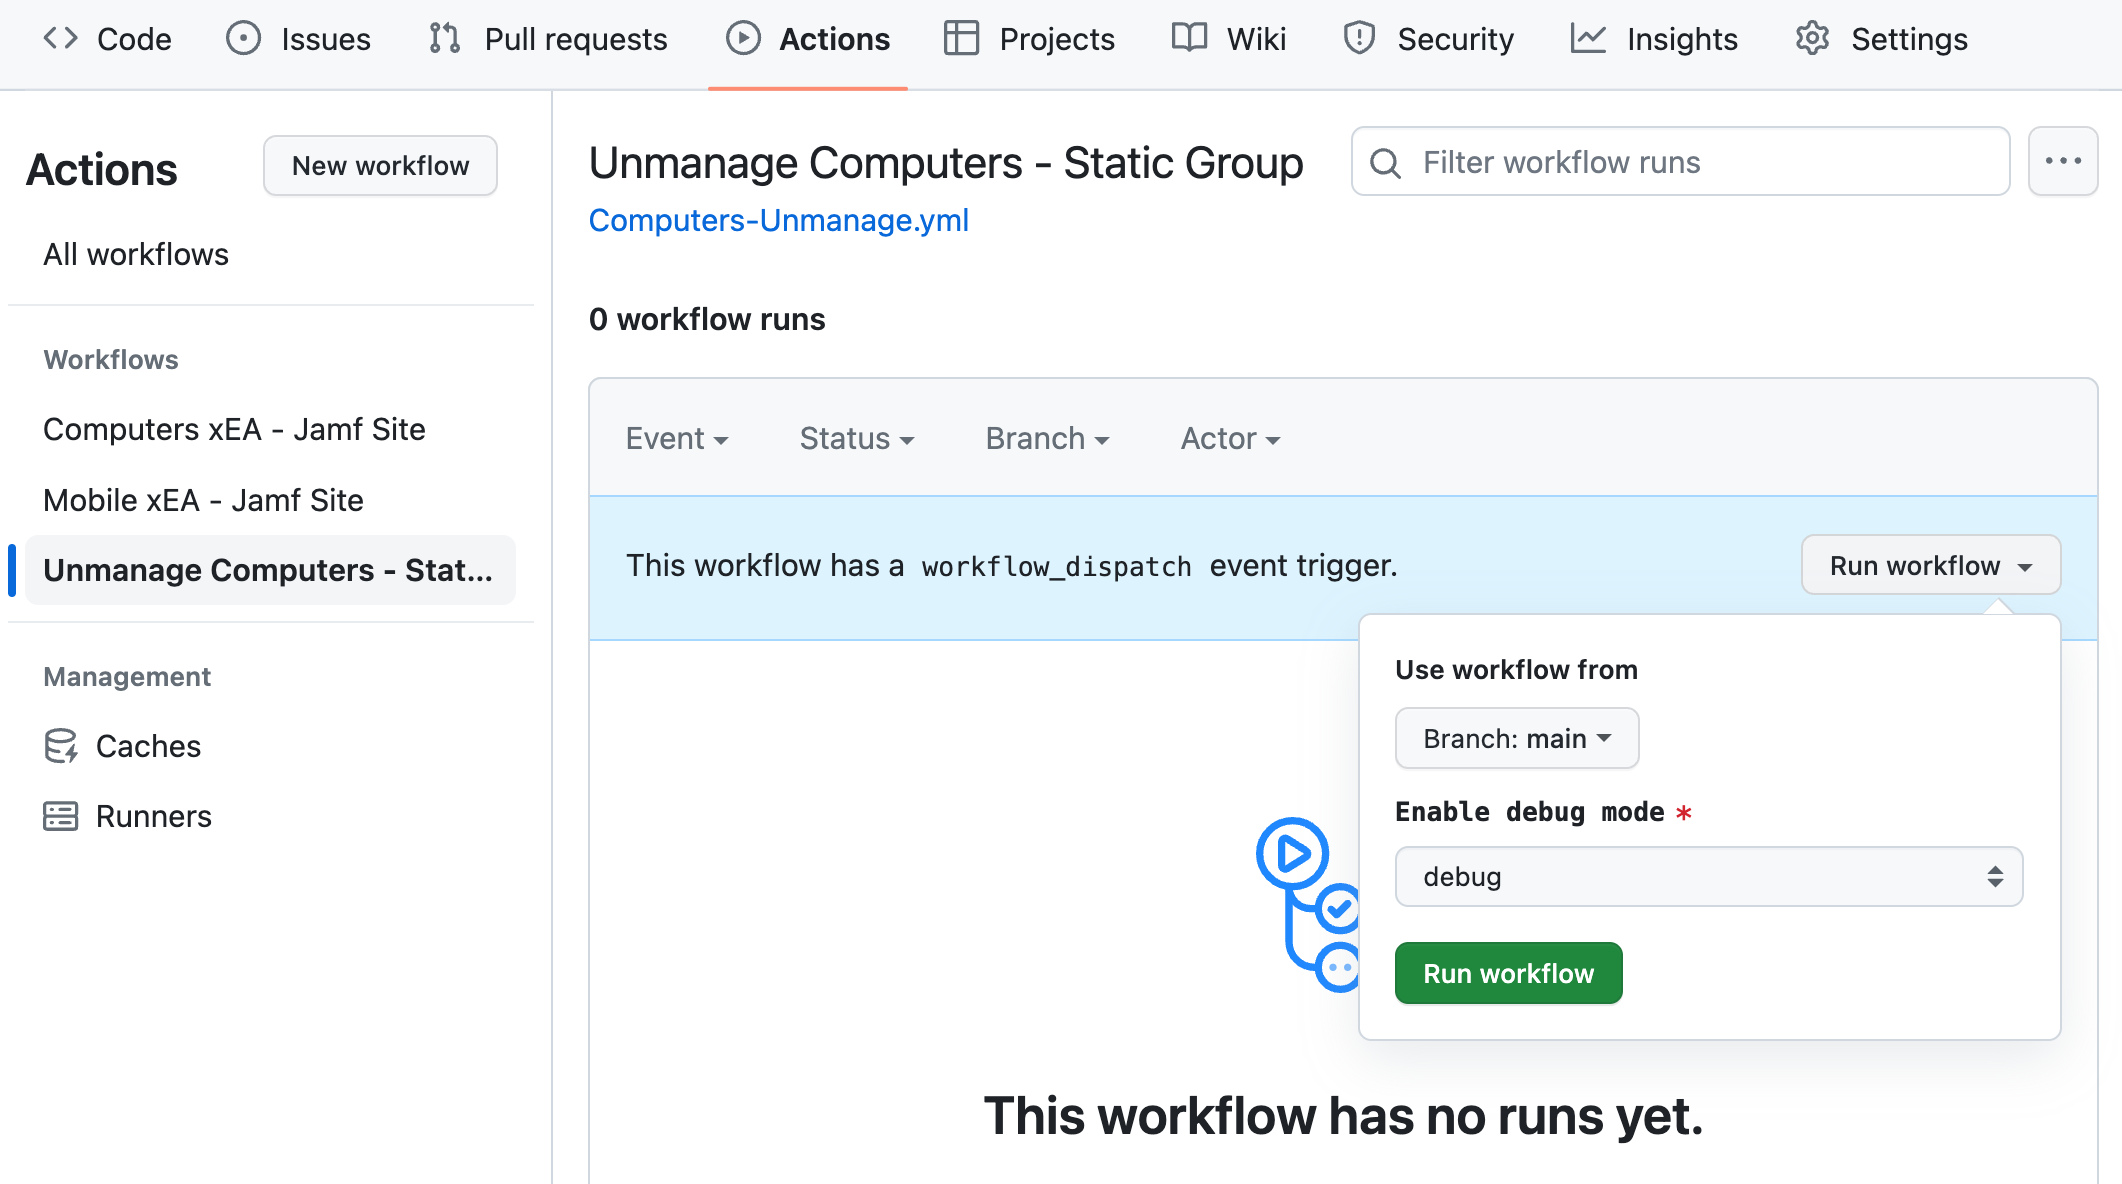
Run the Workflow
After testing this in your non-production environment, click Actions in the GitHub Action repository. Then click on Unmanage Computers - Static Group from the left and then click Run workflow. Then click the green Run workflow button. Eventually, the run will show up under Actions, and you can click on it and watch its progress.
Prologue and Future Improvements
Hopefully the information above is enough to get you started if you want to embark on a similar unmanage path. You may find satisfaction in using these scripts against a smart computer group and have it scheduled to run daily or weekly as a GitHub Action or in your CI/CD of choice. Similarly, the Extension Attribute workflows can be edited for your needs.
You may see I have a summary step in the workflow file that doesn’t appear to do anything. My original concept was to have the output of the Python script go in the GitHub Job Summary that would be suitable for export or a way to see what the Unmanage workflow did at a glance. GitHub some documentation about this: https://docs.github.com/en/actions/using-workflows/workflow-commands-for-github-actions#adding-a-job-summary But, I couldn’t get the output from the underlying Python script to get into GitHub Actions. I'd love to hear from you if anyone has ideas on accomplishing this.
Another place for improvement is speed. When I ran this unmanage workflow against a static group of ~750 Macs to be unmanaged, it took over 4.5 hours to complete. I know the Jamf Pro SDK for Python has some ability to handle concurrent API requests, so I’ll start looking into those next.
Feel free to contact me at @technotica on MacAdmins Slack if you have any problems or questions.